Tuesday, February 5, 2013

Candied Jalapeno's aka Cowboy Candy

Hey y'all!! Today has already been a busy day, our washer went out on us so I had to call the local repair guy and schedule him to come out tomorrow to give it a look, ugh!  On the bright side I got to spend the afternoon with my dad shopping and having lunch with him and small man. We went to value village where I picked up more canning jars, 8 to be exact all wide mouth quart jars. We also went to walmart and I picked up a few goodies there, including the stuff to try out these wonderful candied jalapenos. 

This recipe has been floating around facebook so I had to give them a try, a few of my followers make them and have told me they are delicious! 


The directions I have are for canning candied jalapenos. You also have the option to leave these in the fridge but I prefer them to be shelf stable. 

What ya need:
  • Large stock pot with lid and rack
  • jar lifter 
  • non metalic spatula 
  • pint jars with rings and lids
  • Cowboy Candy recipe


Cowboy Candy Recipe:
  • 3 lbs jalapenos 
  • 2 cups vinegar ( I used white )
  • 6 cups white granulated sugar
  • 1/2 tsp turmeric 
  • 1/2 tsp celery seed
  • 1 tsp cayenne pepper (powdered)
  • 3 tps garlic powder

When slicing your jalapenos REMEMBER TO WEAR GLOVES.. I cannot stress this enough. Do not try without gloves, I promise you WILL be SORRY. 


Slice your jalapenos into 1/4 inch slices and set in a large bowl


After your jalapenos are sliced take your sugar, vinegar, turmeric, celery seed, garlic and cayenne and combine in a large pot and bring to a boil. 

CAUTION: This has a very potent smell and will burn if you try to take a whiff of it, so don't hover over the pot. 


Once brought to a boil, lower the heat and let simmer for 5 minutes. 

Dump all your jalapenos into the syrup and simmer for 4 minutes. 


Using a slotted spoon of some sort spoon the jalapenos into your sterilized jars. 


I brought my syrup back up to a boil after removing the jalapenos and let it boil for about another 3-5 minutes. 

Ladle hot syrup into jars to cover your jalapenos. 

Process using a boiling water bath for 15 minutes for pint jars. 

Allow to cool and make sure all your jars have properly sealed. Let sit for 2 weeks so that all those wonderful flavors can merry together. 


Dehydrated Beef Roast

Hey there everyone! It's Tuesday and my back is doing a bit better, still really stiff and sore but I can move! I've got a few projects to do today, mainly with food storage but I have a couple extra's in there for you.

I have had a few requests on facebook asking how I dehydrate my meats.  Right now I am running a test to see how long my dehydrated meats will be shelf stable, stored correctly. In a mason jar vacuum sealed with an O2 absorber in with the meat.


I took a 2lb roast that I bought on sale at the grocery store and boiled it for about 4 hours.

I then let it cool overnight in the fridge and let all the extra juice come off of it.

The next morning I pulled it out and trimmed off ALL the extra fat on the roast and cut it into 1/2 inch cubes.

Lay out your meat evenly onto 2 trays and let it dry fro 2 hours at 145.

After 2 hours drop your temp down to 125 and continue to dry for 6 hours.

Make sure to check your meat to make sure there is no moisture left in the middle, just break a piece in half to test.

I have been told that it can last up to a year if sealed properly, some say only 3 months, I tested this at 3 months and it was still delicious in my stew. I have some set aside to test once a month to see if it rehydrates properly and the taste is still fine. I will update you at the 6 month mark to let you know how it lasted.


This photo is of my stew meal in a jar sealed properly. This is also how I store my dehydrated foods. This is just an example of proper storage for dried foods.

Monday, February 4, 2013

Dehydrating Green Beans

Hey there friends!! I hope your monday wasn't too horrible, I am suffering from some major back spasms today, but I still have accomplished many things. I as able to add canned beef stew to my stockpile food storage, I did my monthly grocery shopping and snagged a few deals on meat and veggies. I also got the house picked up from our superbowl party!

This evening I am going to show you how to eliminate some of that precious freezer space!! I buy the bulk bags of frozen vegetables, corn, green beans, broccoli, peas, and even hashbrowns. 5lbs in each bag, with 3 little ones and two adults we go through LOTS of veggies and potatoes. I also have a tiny side freezer, so that space is very precious to me.

Did you know that you can take those frozen veggies and dehydrate them to save space? OH, yes, yes you can!!!


 Fill your dehydrator trays and dry at 125 F until brittle.


Can you say space saver? I can! How easy!!


This is one of the shelves on my bakers rack, 5 lbs fills a quart jar, if I have some that doesn't fit I just vacuum seal it with my food saver and put it on the shelf.


 I love finding ways to preserve my food that is convenient and space saving.

These veggies rehydrate wonderfully, I make stew meal in a jar with my own dehydrated veggies and it is amazing!!!

How To Pressure Can

Hey there everyone, I have had many requests for recipes and how to's on my canning recipes, today I will be giving a tutorial on how to use a pressure canner.

 So many of my followers on facebook have requested information on the basics to canning, I figured this will be a great start for most of them.

Pressure canning shouldn't be scary, and with today's pressure canners and their safety features there isn't much worry of the canner exploding in your kitchen, if done correctly pressure canning is totally safe!

 I will go through all the steps from sanitizing your jars, lids and rims.. To filling your jars, and loading and processing in your pressure canner.

Here is a list of things you will need to pressure can.


  • Pressure Canner and canning rack 
  • Jar Lifter
  • Non Metallic Spatula
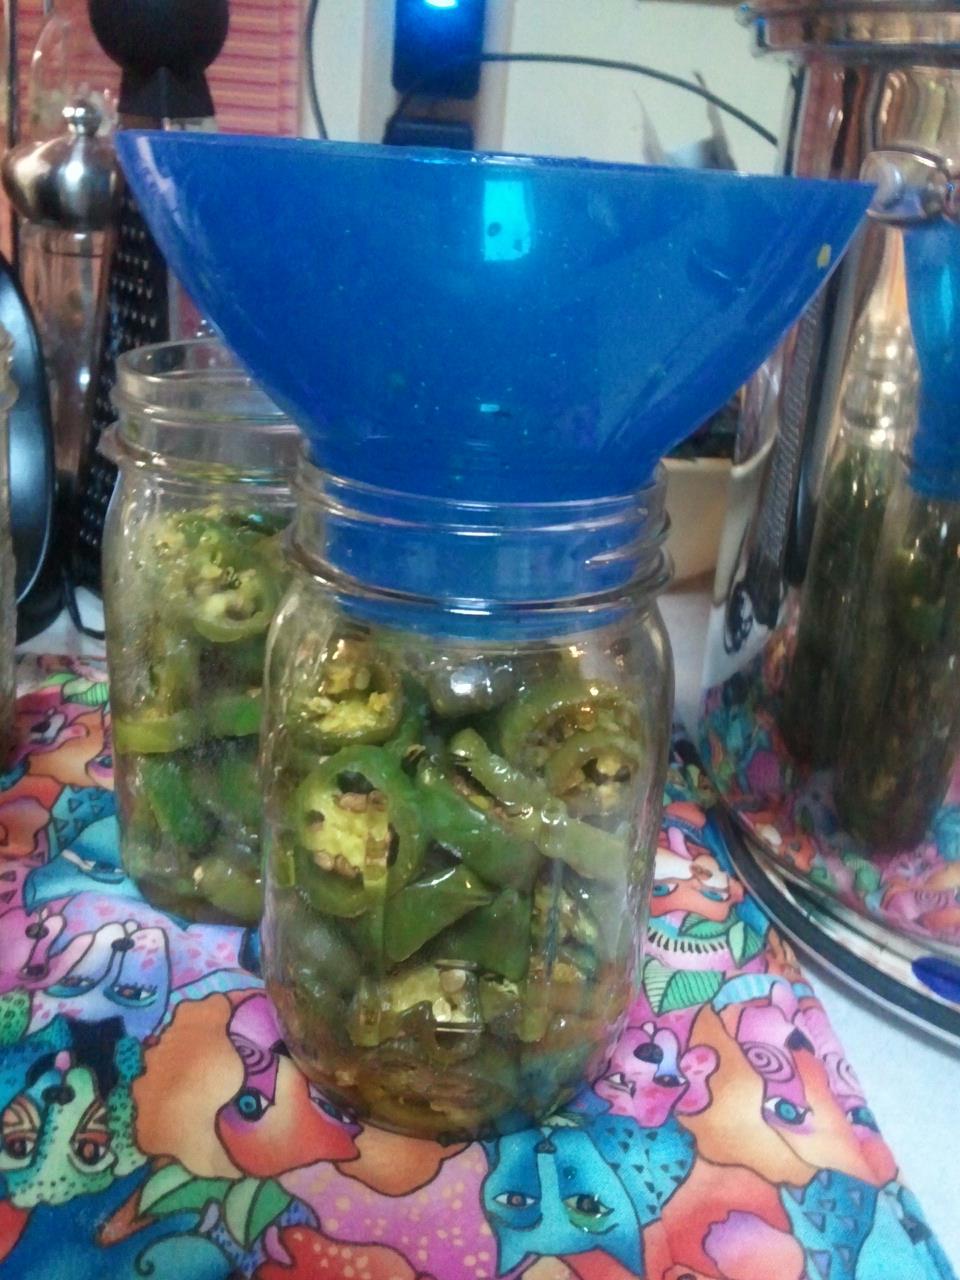
  • Funnel    
  • Mason Jars
  • Rims and Lids
  • Ball Canning Bible 
To get you started these are the essentials you must have!! Here is a link to a set of canning essentials Canning essentials. Walmart also carries the ball canning essentials kit as well.

This is the pressure canner that I have.. it fits 7 quart jars, 10 pint jars or 12 half pint jars.


 Here is a photo of the essentials I use everytime I can. Ladle, funnel, jar lifter and my non metalic spatula.


 These are the walmart brand canning jars. They are a few bucks cheaper and haven't had one issue with them yet.

 The lids are a one time use only, unless you buy tattler lids. You can still use processed lids for dry canning but you cannot pressure can with them once they have been used.
These are just part of my quart collection, as you can see from the photo above I keep a mass supply of canning jars big and small


After you have gathered all the things you need to start pressure canning you must find a recipe to can. I like doing already made meals as well as just canning individual items, such as potatoes, tomatoes, green beans .. etc..

This is where the Ball Canning Bible comes in handy, they have recipes for meals as well as individual items.

Here is an example. Green bean recipe from The Blue Book Guide to Preserving by Ball

"1 1/2 to 2 1/2 pounds beans fresh per quart
salt ( optional )
water

Raw Pack: Wash beans; drain. Remove string, trim ends and break or cut freshly gathered beans into 2 inch peices. Pack beans tighly into hot jars leaving 1 inch headspace. Add 1/2 tsp salt to each pint jar, 1 tsp to each quart jar, if desired. Ladle boiling water over beans, leaving 1 inch headspace. Remove air bubbles. Adjust two piece caps. Process pints 20 min, quarts 25 minutes at 10 pounds pressure. " - The Blue Book Guide to Preserving by Ball

If you prefer to hot pack the only thing different is blanching the beans for 5 minutes, which is not necessary but you can if you want to.


Sanatizing your jars, lids, and rims.


Hot soapy water, wash thouroughly and rinse. I place my jars in a 200 degree oven to keep warm after I have washed them. You may also use the sanatizing cycle on your dishwasher as well.


Place lids in a pot on your stove to keep warm, do NOT boil them, you can interfere with the sealing on the lids if they are boiled.

Preparing to pack your jars.
Take your product and raw or hot pack your jars remembering to leave the appropriate amount of headspace in your jars. Click the link to see a photo of the correct levels for headspace.


Correct headspace

Take your non metalic spatula and run it along the inside of your jar 2 - 3 times to remove any trapped air bubbles inside of your jars.

Take a damp cloth and wipe rims to remove anything that may have been spilled during the packing process.

Adjust your lids and rims, don't screw the lid on too tight, just so it is snug.

Place 3 quarts of water into your canner.  On my canner there are lines on the inside of the canner, as I point out in this picture.


Using the jar lifter place jars inside of the canner.


Once all your jars are inside of your canner place lid on your canner and tighten. Bring heat up, and wait for a slow steady steam of steam to pour out of the vent pipe. With my electric range it is hard to regulate heat so I do a lot of turning up and down the heat to get the right temperature, I've found that between med and med high is the perfect temp for my range, different ranges will have different results. Express steam for 10 minutes then add weight. In the green bean recipe it called for 10 lbs of pressure.  Place the weight on top of the vent pipe and wait for the cover lock to pop up and the weight to start rocking. Time starts when your weight comes to a steady rock. If you have never used a pressure canner before, you will know it's rocking when you see it.

After the time is up immediately remove canner from heat and let the canner cool down on it's own. Once the cover lock has dropped down remove weight and allow to cool for an extra ten minutes.

Twist canning lid off and lift AWAY from you. Trust me you do not want a steam facial from this puppy.


Using your jar lifter remove jars from canner and set in a place to cool for at least 3 hours.

You will start hearing the pings sometimes right away! Once jars have cooled make sure all of them have sealed and remove rings.

Do not leave the rings on, bacteria can grow underneath the rings and if the seal somehow gets broken, having that ring on there prevents you from knowing!


That is my tutorial. I hope this will help you all who are new to the canning world or want to get started. If done correctly this process is not difficult and is very safe. Remember all pressure canners aren't the same and if you do not have my exact model your instructions may be a little different. Please make sure you read your manual on how to use your specific model, this is just a guide to help introduce you.

Resources - Ball Blue Book Guide to Preserving

Canned Beef Stew

Hey y'all!!! Today was my big grocery shopping day and I found 6lbs of stew meat on sale along with about 10lbs of chicken breast on sale!! So I'm canning beef stew today and I thought I would share with y'all!!!

Whatcha need:
12 quart mason jars with matching rings and lids
Jar lifter
Non-metalic Spatula
Canning funnel
Beef Stew Recipe

Beef Stew Recipe:
1 tbs oil
6lbs Stew Meat (when I bought mine it was already cut, but you could always buy your favorite cut and cut it into 1 inch cubes)
15 small carrots sliced
3 onions cubes
6 large potatoes or 12 small
4-5 celery stalks sliced (I didn't add this to my recipe today cause my non caffeinated brain forgot to pick it up)
1 1/2 tsp salt
1/2 tsp pepper
1tbs garlic powder

Take your Stew meat and toss it in a frying pan and brown meat in the 1tbs of oil.

While your meat is browning chop peel and slice all your vegetables and place into a large stockpot


Drain off meat and toss it in with your vegetables, and cover with hot water or beef broth, I do a combo of both, bring to a boil.

While your stew is coming up to a boil sanitize your jars lids and rims. Place jars in a 200 degree oven to keep hot, use your jar lifter to remove them from the oven.

Once your stew is brought to a boil, laddle hot stew into jars leaving 1inch headspace.
Using your non-metalic spatula remove the air bubble from your jars and wipe rims of jars with a damp towel, I usually put a little vinegar on my towel to cut through the grease from the meat.

Process quarts for 1 hour and 30 min
Process pints for 1 hour 15 min

Wait 3-6 after removing your jars from the canner and be sure all have sealed properly, store and enjoy within 1 year :)


Friday, February 1, 2013

Canned Portugeuse Bean Soup

Hey y'all!!! Got one more recipe for y'all today! This recipe is per request of my dad! We love feel good food and what is better on a cold fall day then a hot bowl of soup?


What you will need:
12 quart jars with rims and lids
pressure canner
jar lifter
non metalic spatula
Saucepot


I got my recipe over at My Hawaiian Home this is the closest recipe I can find to my mom's original recipe! 


This is how my soup turned out.. .doesn't it look delicious!!

The only thing I do not add is the macaroni, they will not withstand being canned. I have not come across any recipe where noodles were a success being canned. They seem to go rancid within just a few months and break down alot during the process. 

Cook recipe and fill your sterilized canning jars leaving 1 inch headspace

Process quarts for 75 min and pints for 60 min at 10# of pressure

Once processing is finished remove and allow to cool and wait for the "pings" 

Aloha!! 

Canned Spaghetti Sauce

Afternoon friends!!! It's been a busy busy day already! We are getting close to 800 fans now on my facebook page! This is so exciting for me. When I started my facebook page I never thought in a million years that it would grow as much as it has! I love everyone on there, I spend more time on there then I do my personal fb page. Oh and when I hit 500 I posted a giveaway go check it out Prepper Nicki's Giveaway.


Okay so onto my recipe!! Canned Spaghetti Meat Sauce!! You get to control the ingredients, which is the best part!

What you will need:
12 quart jars with rims and lids
pressure canner
jar lifter
non metalic spatula
Saucepot

Sauce Recipe:
5lbs Ground turkey or Ground Beef ( I use ground turkey for almost everything but if I find a sale I will use ground beef)

1 1/2 cups chopped onion ( 2 medium onions )

8 cups cooked or canned tomatoes

2 cups tomato paste ( to thicken the sauce )

4 tbs italian seasoning

2tbs brown sugar


In a large saucepot brown your meat, don't worry about it cooking all the way through the processing will take care of that.

Add your onion and cook till just tender and drain off excess fat

Add remaining ingredients and simmer till it has reached your desired thickness

Ladle hot sauce into quart jars remembering to leave 1inch headspace

Run your non metalic spatula and remove air bubbles

Put your lids and rims on and Process

Quarts for 1hr 15min, Pints for 1 hour at 10# of pressure!!


After processing pull your jars out and put them in a place to cool for 6-12 hours and then check to make sure all have sealed correctly ( I usually don't wait this long, I check them after about 3 hours, I don't like waiting for the next day then have my food go spoiled overnight!
"Pinging" can begin as soon as the jars are removed! :)

Enjoy folks!!