Showing posts with label recipes. Show all posts

Tuesday, February 26, 2013

Chicken Noodle Soup Meal Jar

Recipe time!!! Here is a delicious meal in a jar recipe that will be shelf stable for 5 years when packaged as directed!!

I do not sponsor for any certain brand so you may use your brand of choice. I use a mixture of thrive, augason farms, and homemade.

For this recipe I didn't use any homemade items, but here you go! My chicken noodle soup in a jar!!

Ingredients:
1 1/2 cups egg noodles
1 cup freeze dried chicken ( for mine I used the vegetarian chicken alternative )
1/4 cup dehydrated chopped onion
2/3 cups freeze dried carrots
1/3 cup freeze dried celery
1-2 tbs chicken bouillon
a pinch of pepper


Layer all your ingredients in your jar, top with an O2 absorber and adjust ring and lid onto your mason jar.

For extra protection I also use my jar sealer attachment for my food saver.

This takes very little time so I usually do about 10 at a time!

Enjoy!!

Sunday, February 24, 2013

Homemade Fabric Softener

Here is a simple cheap recipe that really is worth it. The prices of fabric softener are seriously outrageous. These takes very little time to whip together, and is extremely cheap.

There are tons of hair conditioner scents out there so you can choose your favorite, and if you want a little added scent add in some essential oils to strengthen the scent!!

Ingredients:
6 cups hot water
2 cups hair conditioner
3 cups vinegar


Combine hot water and hair conditioner to dissolve the hair conditioner. Use a wire whisk if needed.

Add in the vinegar and combine and put into the container of your choice using a funnel!

You can use an old milk jug, oj jug or here I have mine in an old coffee creamer container. (which was cleaned out completely before hand.)

 Use 1/2 cup per load, don't worry the vinegar scent will not come through on your clothes.


This will settle over time so make sure before adding it give it a shake.

Enjoy folks!

Tuesday, February 19, 2013

Homemade Instant Oatmeal

I love making my own food.. the convenience is nice when you buy them in the stores but did you know that it's just as easy to make it yourself at home? It isn't time consuming and YOU control the ingredients.. no mystery ingredients that you can't pronounce or even know what they even are!!

Here is my recipe for homemade instant cinnamon and brown sugar oatmeal!


Ingredients:
5 cups quick oats
1 cup instant dry non fat milk
1/2 cup brown sugar
1 1/2 tsp cinnamon
1/4 tsp nutmeg
1/4 tsp allspice

Combine all ingredients in a large bowl, I used a gloved hand to break it all down and combine thoroughly.

This recipe will fit into 2 quart sized mason jars or you can break it down into sandwich sized ziploc bags, 1/4 cup of oatmeal mix into each bag. Combine with 2/3 boiling water and serve.


Homemade Granola

Use this delicious recipe to add crunch to your yogurt or just pour a little almond milk over this alone and enjoy.

A healthy flavorful alternative to those breakfast cereals and bars that are FULL of sugar!!


Granola:
4 cups quick oats
1 1/2 cups sliced almonds
1/2 cup light brown sugar
1 tsp cinnamon
1/4 tsp salt
1/2 tsp pure vanilla extract
1/2 tsp hazelnut extract
1/2 cup coconut oil
1/2 cup honey
add in your choice of dried fruits. Blueberries, cranberries, raisins.. etc..

Preheat your oven to 300


Combine oats, almonds, brown sugar, cinnamon and salt.


In a small pot on low warm your honey and oil and stir in the extracts

Add liquid to the oats mixture and combine with a wooden spoon. Use gloved hand to fully distribute.
Place on baking sheet and bake for 20-30 min stirring ever 10 minutes.


Allow to cool to room temperature and add in your choice of dried fruits and place in an air tight container


Enjoy to your liking!!! Thanks for visiting y'all!!!

Wednesday, February 13, 2013

Honey Dew Melon Jelly

Sweet, Simple... Love!


Honey Dew Melon Jelly


Ingredients:


  • 1 Honey Dew Melon "gutted"
  • 6 cups sugar
  • a drop of vanilla
  • 1 box sure-jell pectin


Directions:


  • Heat melon meat over the stove until it has become liquefied and all the chunks are gone.

  • Add Pectin and stir to dissolve

  • Add 6 cups sugar stir and return to boil.

  • Test your jelly by taking a spoon and dip it into the jelly, and let watch the drips of jelly as they fall back into the pot, if they are thicker and drip together like a sheet your jam is ready. If they fall off quick like rain on a window then your need it to simmer some more.


  • Fill hot jars with your jelly

  • Wipe off your rims and adjust your rings and lids.

  • Flip your jars over for 5 min

  • Flip right side up and let set.

  • My jelly didn't take long to set up, let cool and store!!


Tuesday, February 5, 2013

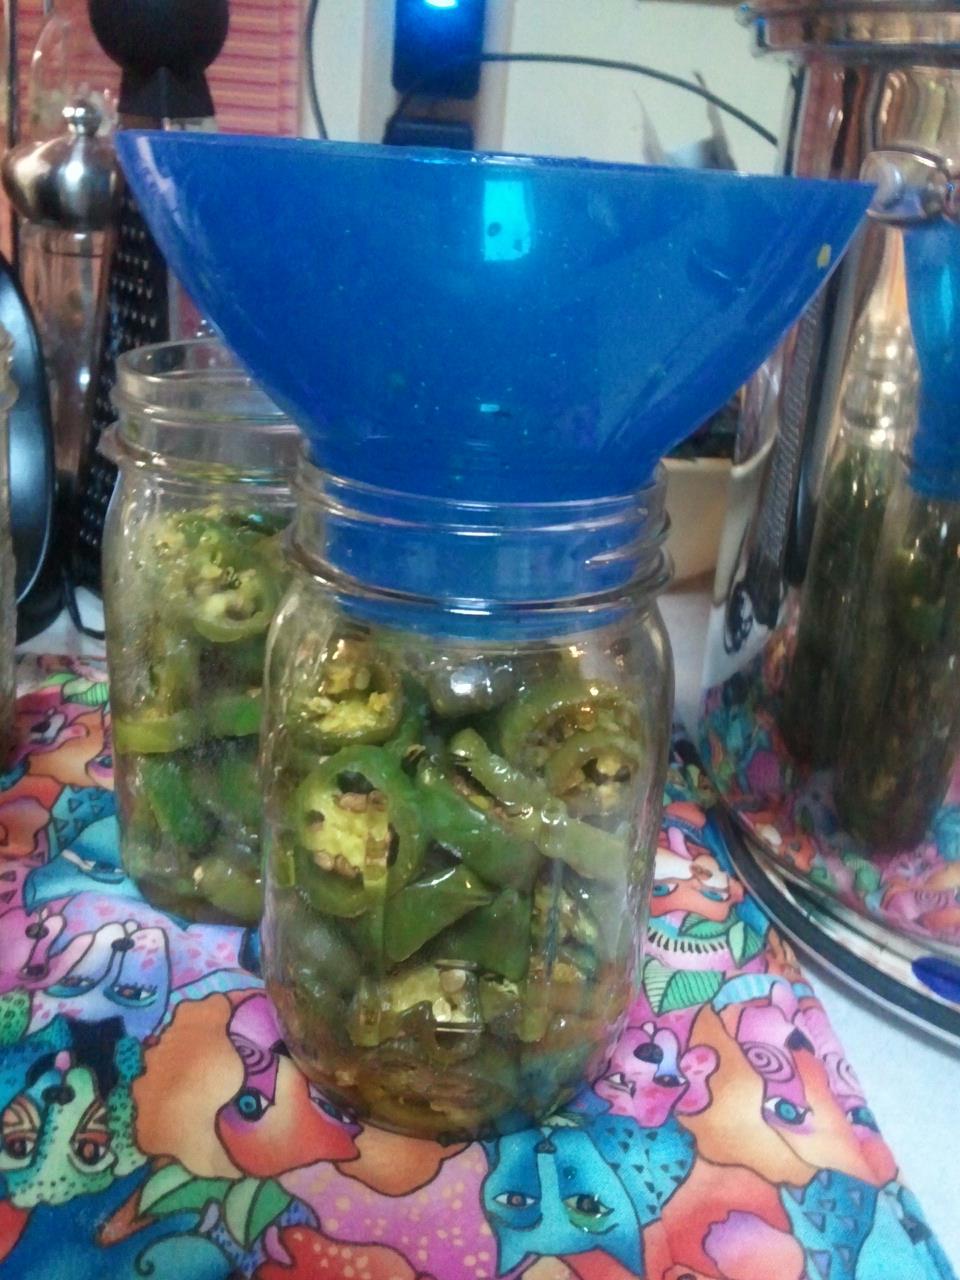
Candied Jalapeno's aka Cowboy Candy

Hey y'all!! Today has already been a busy day, our washer went out on us so I had to call the local repair guy and schedule him to come out tomorrow to give it a look, ugh!  On the bright side I got to spend the afternoon with my dad shopping and having lunch with him and small man. We went to value village where I picked up more canning jars, 8 to be exact all wide mouth quart jars. We also went to walmart and I picked up a few goodies there, including the stuff to try out these wonderful candied jalapenos. 

This recipe has been floating around facebook so I had to give them a try, a few of my followers make them and have told me they are delicious! 


The directions I have are for canning candied jalapenos. You also have the option to leave these in the fridge but I prefer them to be shelf stable. 

What ya need:
  • Large stock pot with lid and rack
  • jar lifter 
  • non metalic spatula 
  • pint jars with rings and lids
  • Cowboy Candy recipe


Cowboy Candy Recipe:
  • 3 lbs jalapenos 
  • 2 cups vinegar ( I used white )
  • 6 cups white granulated sugar
  • 1/2 tsp turmeric 
  • 1/2 tsp celery seed
  • 1 tsp cayenne pepper (powdered)
  • 3 tps garlic powder

When slicing your jalapenos REMEMBER TO WEAR GLOVES.. I cannot stress this enough. Do not try without gloves, I promise you WILL be SORRY. 


Slice your jalapenos into 1/4 inch slices and set in a large bowl


After your jalapenos are sliced take your sugar, vinegar, turmeric, celery seed, garlic and cayenne and combine in a large pot and bring to a boil. 

CAUTION: This has a very potent smell and will burn if you try to take a whiff of it, so don't hover over the pot. 


Once brought to a boil, lower the heat and let simmer for 5 minutes. 

Dump all your jalapenos into the syrup and simmer for 4 minutes. 


Using a slotted spoon of some sort spoon the jalapenos into your sterilized jars. 


I brought my syrup back up to a boil after removing the jalapenos and let it boil for about another 3-5 minutes. 

Ladle hot syrup into jars to cover your jalapenos. 

Process using a boiling water bath for 15 minutes for pint jars. 

Allow to cool and make sure all your jars have properly sealed. Let sit for 2 weeks so that all those wonderful flavors can merry together. 


Wednesday, January 9, 2013

Homemade Better Bisquick Recipe

Ok, so since I did my mini pancake bites in my previous blog post, I figured I should probably give you the recipe for the homemade bisquick I make here and never have to run out of and always have on hand. (without the added stuff inside that you don't know what it is.)

Bisquick is so versatile, you can make numerous things with it... from pancakes, to biscuits to chicken and dumplins to fried chicken. It's expensive! So lets save you some money and make it at home!!!

Ingredients:
6 cups of flour
3 TBS baking powder
1 TBS salt
1 cup vegetable shortening

Take all your dry ingredients and mix together
take your 1 cup of shortening and cut this into your dry ingredients until it looks almost like a cornmeal.

I always make a double batch because I use it constantly with 3 little ones around.

Store in an airtight container in the fridge, and use as you would the regular old bisquick.
( I do not know the original source of this recipe but I know it is floating around all over the interwebs )


WARNING: With this recipe you will never buy bisquick again!!! :)

Mini Pancake Bites

Afternoon y'all!!! 
   Well, we made to our halfway through point in the week, yay! We sure have been busy busy around here with our garden planning and regular house hold activities, kids going back to school after winter break and getting back into the groove of things. 

So today I thought I would show you guys a quick easy breakfast fix for those busy mornings, rushing kids out the door and getting yourself off to work. 

Mini Pancake Bites:

2 cups home made bisquick ( View next blog )
2 eggs
1 cup milk
Topping choices:
chocolate chips
sausage
bacon
really.. the choices are endless 

Preheat your oven to 350

Mix it all together and seperate evenly into a muffin tin. 
Pop on all of your toppings and back about 15 min.

Now, really how easy is that? To make it even easier mix up a big batch of pancake mix and store it in the fridge inside of a recycled ketchup container!! :-D

Next I will show you how to make homemade bisquick! 


Sunday, December 30, 2012

Dehydrated Chicken Stock for Food Storage/Space Saver

Hey Y'all!! Okay, so I had this freezer bag FULL of chicken stock from when I boiled my chicken for my dehydrated chicken. So, that takes up SO much room in my freezer so I thought I'd give it a whirl and try to dehydrate it.

What I did was I took that stock and put it in a pot on the stove and let it reduce down to about 2tbs worth.
its really thick fyi and it makes your house smell like chicken.

I strained out all the extra chunks that were left over and laid out parchment paper onto a dehydrator tray.


My dehydrator doesn't have a temp gauge on it, so I just popped it in and let it do it's magic!

It turned out Wonderful, super concentrated, I am going to grind it into a powder and store it. I will be doing this with lots of my stock, be it beef or chicken!! Yum!!

Wednesday, December 26, 2012

Sourdough Starter and Bread Recipe.

Hey Y'all!!! Day after Christmas so I went out braved the stores early this morning!! Guess what.. I SCORED!!!
Went to Wal-mart and snagged another shelf to add into my pantry (my stock is just growing like a weed) YAY! 
Then I hit up Value Village and scooped up a few mason jars and this!
 A Black and Decker Vacuum Sealer!! My mason jars and food guard.. grand total of 10 dollars. Can you say a steal of deal? I'd say!! Okay, onto the point of the blog. Have you ever had homemade sourdough bread? No? Is it easy you ask? YES of course it is!! Low maintenance, and super easy! Here ya go bloggers!! 


Ingredients:

2 cups all-purpose flour
1 packet (2 1/4 teaspoons) of active-dry yeast
2 cups warm water (105 to 115 degrees F.)
You leave this lightly covered with a kitchen towel for 6 days.
Feed it every other day 1 cup flour and 1 cup warm water. (take a note pad and leave it by your starter listing days 1 - 6 day 1 being the day you put this bad boy together)
After day six transfer to a plastic container with a lid and put it in your fridge when ready to use.

Now when you use this starter, you must re feed it. So for my bread recipe I use 1 1/2 cups of my starter. So when I take it out. I add back 1 1/2 cups flour and 1 1/2 cups water and let it sit for overnight and put it back into my plastic and to the fridge again. I know it's soooooo hard!! LOL

Okay, for 1 loaf of my yummy sourdough.

2 cups flour
1 1/2 cups sourdough starter
3/4 teaspoon salt

Put it in your mixer and let it mix till it no longer sticks to the sides of your bowl.

In a lightly oiled bowl cover and let rise 1 1/2 hours
after that take it back out and knead out all air pockets and form into your desired shape (I shape mine into a rectangle to fit into my loaf pan) but you can do a bread bowl or anything.

lay on a floured surface and cover lightly with a kitchen towel and let rest 1 more hour.

Preheat oven to 400 degrees and bake for 1 hour

Your bread with have a dark crust and if you knock on the bottom should sound hollow. 


Enjoy y'all!!! 

Tuesday, December 25, 2012

Food Storage Beef Stew

One more for tonight and then I think I will be done for the evening! Trying to do some catch up since it's been a while since I've posted!

Okay, so in my last post I told you that I went hog wild with my dehydrator. I took a 5lb bag of mixed veggies and it reduced down to 1 quart size jar. Can you belive that!? Here!
The mixed veggies are on the right!! 5lbs into that!! Amazing. stored correctly they will last for years. But, today I am gonna show you how to make some delicious beef stew all from food storage!!


  1. So I took about a cup and 1/2 of my dehydrated beef roast. 
  2. 1 cup of my mixed veggies (corn, green beans, peas, and carrots is in it)
  3. 6 beef bullion cubes (you can use store bought or homemade. I will be trying some homemade chicken bullion very soon to show y'all!)
  4. 6-8 cups of water 
  5. 1 1/4 cup of rice
  6. 1 Tbs of garlic powder or dried minced garlic
  7. salt and pepper to taste (I add extra pepper cause I love the bite pepper gives it)
  8. 1/4 cup dehydrated chopped onion
  9. 1/2 cup dried diced potatoes 
Throw it all into your stock pot and let it simmer on low-med so it can re-hydrate for about and hour or so and you have a delicious thick beef stew. You can do this fresh or from food storage. With it being from food storage I didn't have to prep anything, I had everything ready pre-cooked and ready to go!

Yum right?! Top it off I made a fresh loaf of Sourdough bread from my starter. Which I will be posting tomorrow. This meal has lots of flavor, just because it's food storage doesn't mean you have to lack in flavor or quality!!! Enjoy y'all!! Take out what you don't like, and add what you do!!

Homemade Dulce De Leche


Merry Christmas y'all!! Ok, so I know it's been a while since my last post.. but tis the season!!

We sure have been busy around here prepping and getting ready for the Holiday season.

But I have a wonderful recipe today for y'all. From the lady who does 365 days of baking. YUM!

Homemade Dulce De Leche, this makes a wonderful syrup, or addition to your coffee or topping for your favorite dessert!

Homemade Dulce De Leche (original source)


  • So, you take 2 cans of sweetened condensed milk and 3 clean pint size mason jars.
  • Take and fill your mason jars with the sweetened condensed milk and fill your 3 jars as even as possible. Put the lids and rings on the mason jars.
  • Place them in your crock pot and fill with water to just below the lids.
  • Set your crock pot to low and let work for 10 hours.

I let mine sit over night and it was like MAGIC!

The milk caramelizes so gorgeously and it is DELICIOUS!! Yum Yum!!! Enjoy y'all!!

Thursday, November 15, 2012

Chicken n' Broccoli

Hey ya'll!!! Busy busy thursday it's been. I'm actually just sittin down to watch a few episodes of my favorite show, Supernatural... Oh my wow.. isn't Dean just dreamy?

Oh... yea sorry... so after the long day we had here the last thing I wanted to was slave over a hot stove. My mother sure did teach me right.. being an island girl she sure knew some tips and tricks of her own, now this recipe can be modified for crock pot cooking as well.

Chicken or Beef n Broccoli

Ingredients:

1lb chicken or beef (if using crock pot you do not need to pre cook chicken or beef)

1tbs sesame oil

1 1/2 cup soy sauce

1 tsp ground ginger

1 tbs fresh minced garlic

1 tbs cornstarch

1/2 bag frozen broccoli

Directions:

Take your chicken or beef and dice into 1/2 inch chunks.
Cook that up with your garlic.
Once your chicken or beef is cooked through add in remaining ingredients and bring to a boil.
Cover and simmer over low heat for about 20 min. ( I usually wait and start my rice pot at this point)

Serve over a warm bed of rice. No need to add extra salt or pepper. As my kids would say ... its so ono mom!

Enjoy ya'll!!