These baked meal bars are great on the go as a quick meals on the go, or if you just don't like a big breakfast. These are quick and easy to whip together as well!
Ingredients:
2 cups oats
1/2 cup chopped almonds
1/4 cup dried cranberries
1/4 cup dried blueberries
1/2 dry nonfat milk
1/2 cup honey
3 TBS brown sugar
3 TBS peanut butter
1/2 tsp salt
Line an 8x8 baking dish with parchment paper leaving enough on either side of the dish so that you can use it to lift the bars out of the dish after they have cooled.
Mix oats, almonds, cranberries, blueberries and milk in a bowl.
Combine honey, brown sugar, peanut butter and salt in a small sauce pan and heat till the peanut butter has melted.
Combine dry and wet ingredients and coat thoroughly. I just got in there with my hands to completely coat.
Press mixture into your baking dish evenly and bake at 300 degrees for 35 min on the middle rack.
Let bars COMPLETELY cool before pulling out and slicing into bars.
Take a very sharp knife and slice into the size bars you prefer!
Tuesday, February 26, 2013
Chicken Noodle Soup Meal Jar
Recipe time!!! Here is a delicious meal in a jar recipe that will be shelf stable for 5 years when packaged as directed!!
I do not sponsor for any certain brand so you may use your brand of choice. I use a mixture of thrive, augason farms, and homemade.
For this recipe I didn't use any homemade items, but here you go! My chicken noodle soup in a jar!!
Ingredients:
1 1/2 cups egg noodles
1 cup freeze dried chicken ( for mine I used the vegetarian chicken alternative )
1/4 cup dehydrated chopped onion
2/3 cups freeze dried carrots
1/3 cup freeze dried celery
1-2 tbs chicken bouillon
a pinch of pepper

Layer all your ingredients in your jar, top with an O2 absorber and adjust ring and lid onto your mason jar.
For extra protection I also use my jar sealer attachment for my food saver.
This takes very little time so I usually do about 10 at a time!
Enjoy!!
Avacado and Honey Facemask
This is just a quick simple homemade moisturizer mask!
Ingredients:
1/2 ripe avocado
1/4 cup honey
Mash your avocado into a creamy paste
Add honey and mix thoroughly.
Apply mixture evenly over your face
Leave on for 10 minutes
Rinse face with warm water, wipe with warm washcloth to ensure you have removed all of the mask from your face!
Done! Enjoy friends.
Sunday, February 24, 2013
Revitalize Your Hair With Coconut Oil
Us women sure are rough on our hair.. we perm it, dye it, crimp it, curl it, and straighten! We also put gel, hairspray, and so many other products it's not even funny, no wonder our hair is dry and dead!!
Here is an overnight treatment that will leave your hair revitalized, soft by giving it back the natural oils that our daily use shampoos strip it of!
What you need:
Organic Extra Virgin Coconut Oil
Shower Cap

Wrap a towel around your shoulders to protect your clothing from oil stains. Since you are doing this before bed make sure to already have your jammies on prior to treating your hair
Take your coconut oil and completely saturate your hair with the oil. (best if hair is dry before applying)
Take and run a comb through it to ensure you get every strand.
 My daughter took this photo.. didn't even say "Say Cheese" don't I look so happy?
Take and twist your hair up and put on your shower cap, you can also use a hair towel to ensure you don't get any on your pillow and blankets.

Leave this on overnight and it the morning shampoo it out.. you won't regret this, it will leave your hair so smooth and silky!!!!

Totally got photobombed by the 7 year old haha
Use this treatment every other week or as needed!
Here is an overnight treatment that will leave your hair revitalized, soft by giving it back the natural oils that our daily use shampoos strip it of!
What you need:
Organic Extra Virgin Coconut Oil
Shower Cap

Wrap a towel around your shoulders to protect your clothing from oil stains. Since you are doing this before bed make sure to already have your jammies on prior to treating your hair
Take your coconut oil and completely saturate your hair with the oil. (best if hair is dry before applying)
Take and run a comb through it to ensure you get every strand.

Take and twist your hair up and put on your shower cap, you can also use a hair towel to ensure you don't get any on your pillow and blankets.

Leave this on overnight and it the morning shampoo it out.. you won't regret this, it will leave your hair so smooth and silky!!!!

Totally got photobombed by the 7 year old haha
Use this treatment every other week or as needed!
Homemade Fabric Softener
Here is a simple cheap recipe that really is worth it. The prices of fabric softener are seriously outrageous. These takes very little time to whip together, and is extremely cheap.
There are tons of hair conditioner scents out there so you can choose your favorite, and if you want a little added scent add in some essential oils to strengthen the scent!!
Ingredients:
6 cups hot water
2 cups hair conditioner
3 cups vinegar
Combine hot water and hair conditioner to dissolve the hair conditioner. Use a wire whisk if needed.
Add in the vinegar and combine and put into the container of your choice using a funnel!
You can use an old milk jug, oj jug or here I have mine in an old coffee creamer container. (which was cleaned out completely before hand.)

Use 1/2 cup per load, don't worry the vinegar scent will not come through on your clothes.
This will settle over time so make sure before adding it give it a shake.
Enjoy folks!
Friday, February 22, 2013
Keep them critters out!!!
Over on my facebook page I've had many requests asking how to keep fur critters domestic and wild and also creepy crawlies out of the garden. I've been doing my research and have compiled a few ideas on how to keep them buggers out of your garden without using any chemicals!
Slugs:
Coffee- take old brewed coffee and put it in a spray bottle spray on your soil surrounding the garden and the slugs will stay out.
Beer Can Trap- Take an old beer can and cut in half, bury it in the soil up to the rim and put some beer, sugar water, soda pop and the slugs will be attracted to it and fall in and drown. You can also use tuna cans for this. Remember to discard the can and contents and replace regularly!
Salt- My grandmother will swear by Hawaiian salt keeping them suckers out!! Line the garden bed with it and fear no slugs!! Note: DO NOT PUT IN YOUR GARDEN. If you have raised beds place around the outside of the bed to keep slugs out... salt can be fatal to your garden, you may not have slugs, but you also may not have a crop to harvest either.
Cats:
Chicken wire- used in many ways.. you can make a cage around your garden or if you want lay out our soil then add a layer of chicken wire to the top of your bed to keep cats from using your garden bed as a litter box.
Coffee Grounds- Keeping coffee grounds in with your soil also can deter cats.
Cayenne Pepper - Sprinkle some of that spice on the outer rim of your garden bed.. I have been told this can work, and it can fail.. some cats are just that stubborn. If you are willing to try it let me know how this one works out!!
Give it it's own space- If you have the room and time.. and if the cat is yours, give the cat it's own outdoor litter box, a small sandbox or even a dollar store litter box filled with litter or sand the cat may be up to using that more then your bountiful garden!.. If the cat isn't yours and you don't know who the cat belongs too I recommend getting a trap from your humane society and getting that cat a home. I know in my area there are more stay cats then owned cats and it is sad how many die on the streets, if each one of us can get a cat off the street to stop it from reproducing more feral kitties won't that help? Just a thought!
Birds:
Bird netting- I know bird netting can be hard to work with but using some pvc you can make a removable cage that is easy to work with!
Here is a link to some plans
Rocks - take a bunch of those garden rocks and paint them to look like lady bugs and strawberries, place them in your garden prior to your fruit coming in and by the time your fruit comes in the birds will be tired of trying!!
Wild Animals. (Deer, Moles, Voles, possums..etc):
Dogs- Having your furry pet around should keep them guys out of your yard, I have followers who swear by it!
Motion Sensors- Motion sensored lights, and/sprinklers. (this can work for them kitties too)
Traps- For possums/raccoon's trap em and remember to re locate at least a few miles away from your home so they don't come back.. I usually make a trip to the woods to get a little mud on my tires to relocate away from the city!
There are other inhumane ways of dealing with moles and voles which my dad has used because moles are such buggers and all our other methods of deterring them had failed.
Hair- yes you read that right.. human hair... deer don't like the smell of us human kind apparently we stink! Sprinkle some around your garden to keep them away!
Bacon- Line the outside of your garden with bacon grease.. them long eared friends don't like the smell, keep them out of your salad garden.
Cayenne- as well as your cats, this will deter coons away from your garden as well.
If you have a request for a certain critter you want to keep out of your garden please ask. I hope that this helps some of you who are looking for remedies to keep them critters away!!!
27 days till spring!!! Who else is itching to get some dirt under their nails? Have a great day y'all!!
Tuesday, February 19, 2013
No Sew Fleece Blanket
Living in the great northwest, most of the year we are covered in fuzzy pj pants, sweats, sweaters and fleece blankets! I don't buy fleece blankets, I make them. Today I am going to share how to make your own, NO SEWING needed!!!
What you need:
2 equal pieces of fleece material
Scissors
ruler
Choose the size you want your blanket to be, these ones here are for the kids when they lay on the couch so they are a bit smaller.
You will need two peices of fabric, the print of your choice as you can see this is my middle child's blanket so of course it is tinker bell! The other side is a purple solid color.

Lay them on top of each with the "wrong" sides facing each other or the softest sides facing down for the solid color on the bottom and the softest facing up for the printed piece. Getting them as flat as possible

I take a piece of cardboard cut 5x5 like so

Place it in the corner of your fabric and cut out your 5x5 piece of fabric. Do this to all 4 corners of your blanket.
To make the fringe cut your fabric 5 inches deep leaving 1 inch space inbetween, do this all around the blanket.

Take each fringe piece and double knot as tight as possible so it doesn't come undone!


 Do this all the way around and.. I like to tie them once all the way around and then move to the couch to do the second knot so I'm not sitting on the floor for the entire project
 Mr. Skyler didn't wanna get up so I could take a picture so I told him he was going on the internet.. so he covered his face .. haha silly boy!!
Tada! No sew blanket, I've never had an issue with the knots coming undone in the wash, or any other issues with these blankets. They are warm, fuzzy and fun!!!
 Ms. Stacia showing off her brand new tinkerbell blanket!!
Here is another one of the John Deere one that I've recently made.. Adult sized.

Enjoy folks!!
What you need:
2 equal pieces of fleece material
Scissors
ruler
Choose the size you want your blanket to be, these ones here are for the kids when they lay on the couch so they are a bit smaller.
You will need two peices of fabric, the print of your choice as you can see this is my middle child's blanket so of course it is tinker bell! The other side is a purple solid color.

Lay them on top of each with the "wrong" sides facing each other or the softest sides facing down for the solid color on the bottom and the softest facing up for the printed piece. Getting them as flat as possible

I take a piece of cardboard cut 5x5 like so

Place it in the corner of your fabric and cut out your 5x5 piece of fabric. Do this to all 4 corners of your blanket.
To make the fringe cut your fabric 5 inches deep leaving 1 inch space inbetween, do this all around the blanket.

Take each fringe piece and double knot as tight as possible so it doesn't come undone!


Tada! No sew blanket, I've never had an issue with the knots coming undone in the wash, or any other issues with these blankets. They are warm, fuzzy and fun!!!

Here is another one of the John Deere one that I've recently made.. Adult sized.

Enjoy folks!!
Homemade Instant Oatmeal
I love making my own food.. the convenience is nice when you buy them in the stores but did you know that it's just as easy to make it yourself at home? It isn't time consuming and YOU control the ingredients.. no mystery ingredients that you can't pronounce or even know what they even are!!
Here is my recipe for homemade instant cinnamon and brown sugar oatmeal!

Ingredients:
5 cups quick oats
1 cup instant dry non fat milk
1/2 cup brown sugar
1 1/2 tsp cinnamon
1/4 tsp nutmeg
1/4 tsp allspice
Combine all ingredients in a large bowl, I used a gloved hand to break it all down and combine thoroughly.
This recipe will fit into 2 quart sized mason jars or you can break it down into sandwich sized ziploc bags, 1/4 cup of oatmeal mix into each bag. Combine with 2/3 boiling water and serve.

Homemade Granola
Use this delicious recipe to add crunch to your yogurt or just pour a little almond milk over this alone and enjoy.
A healthy flavorful alternative to those breakfast cereals and bars that are FULL of sugar!!
Granola:
4 cups quick oats
1 1/2 cups sliced almonds
1/2 cup light brown sugar
1 tsp cinnamon
1/4 tsp salt
1/2 tsp pure vanilla extract
1/2 tsp hazelnut extract
1/2 cup coconut oil
1/2 cup honey
add in your choice of dried fruits. Blueberries, cranberries, raisins.. etc..
Preheat your oven to 300
Combine oats, almonds, brown sugar, cinnamon and salt.

In a small pot on low warm your honey and oil and stir in the extracts
 Add liquid to the oats mixture and combine with a wooden spoon. Use gloved hand to fully distribute.

 Place on baking sheet and bake for 20-30 min stirring ever 10 minutes.
Allow to cool to room temperature and add in your choice of dried fruits and place in an air tight container

Enjoy to your liking!!! Thanks for visiting y'all!!!
A healthy flavorful alternative to those breakfast cereals and bars that are FULL of sugar!!
Granola:
4 cups quick oats
1 1/2 cups sliced almonds
1/2 cup light brown sugar
1 tsp cinnamon
1/4 tsp salt
1/2 tsp pure vanilla extract
1/2 tsp hazelnut extract
1/2 cup coconut oil
1/2 cup honey
add in your choice of dried fruits. Blueberries, cranberries, raisins.. etc..
Preheat your oven to 300
Combine oats, almonds, brown sugar, cinnamon and salt.

In a small pot on low warm your honey and oil and stir in the extracts


 Place on baking sheet and bake for 20-30 min stirring ever 10 minutes.
Allow to cool to room temperature and add in your choice of dried fruits and place in an air tight container

Enjoy to your liking!!! Thanks for visiting y'all!!!
Monday, February 18, 2013
Seedlings!!!
It is that time of year again!! Spring is upon us and we have the fever!!! I myself have gotten all 3 of my garden beds prepped and filled with dirt and manure. I have started a few of my colder weather seedlings (cabbage, broccoli, cauliflower and a variety of peas) and some of my indoor container plants as well like my jalapenos!!!
So in honor of spring I wanted to give some alternative/repurposing tips to save you money on seedling starters!!!
Grow your seedlings in eggshells. Yes I said eggshells, crack open your egg when making breakfast and save the shell halves. Fill with dirt then plant seedlings in them! When replanting you don't even have to remove them from the shell. Just break a the shell on the bottom to allow the roots to grow!

Eggshell Cartons. Fill with dirt then plant your seedlings!

Take an old paper towel roll and cut into thirds...

I make 4 cuts in the bottom as shown

and fold them over tape it shut.

When it's time to transplant just remove tape, unfold and place in the ground :)
I hope that these have given you some ideas on how to get your seedlings going without paying the price for those expensive seedling pods :)
Trash to Treasure. Benefits of Coffee Grounds
For those of you who don't know. I am from the great state of Washington. What do you think of when you think of Seattle? Coffee?? Uh huh! hahaha.. well yes I do drink lots and lots and LOTS of coffee. So, why put those coffee grounds into the trash when they are so beneficial to your garden bed? Don't drink coffee? No problem, just visit your local/favorite coffee shop and I bet you they are more then willing to share those rich grounds with you as well!!
Benefits of coffee grounds:
- Worms LOVE to feed on coffee grounds and we all know that worms aerate the soil for us, bring on the worms :)
- Cheap and easy to come by
- Coffee is a great source for Nitrogen, Calcium and Magnesium, which are extremely beneficial to your vegetable garden.
- More tolerable to deal with then manure
- Coffee is also a natural slug and snail killer... just spritz the ground with some day old coffee and keep them nasty buggers out of the garden!
So before you throw out those old coffee grounds STOP no no no.. not in the name of love, and it's not hammer time either! Don't toss em, save em. I place mine in an old butter tub, It doesn't take but about a week for mine to fill.. I also crush up my eggshells and mix them together for a wonderful fertilizer!
Wednesday, February 13, 2013
Canned Carrots
Canning Carrots
Ingredients:
Directions:
For pint jars you can add 1/2 tsp of salt per jar or for quarts add 1 tsp per jar.
Process jars in a pressure canner at 10# of pressure for 25 minutes for pints and 30 minutes for quarts.
Recipe from the Ball Blue Book Guide to Preserving
Ingredients:
- Carrots
- Boiling Water
- Salt
Directions:
- Peel and wash carrots.
- Slice to desired length.
- Boil a pot of of water to fill your jars with
- Pack jars with carrots leaving 1 inch headspace
- Ladle boiling water over carrots.
- Remove air bubbles with a non metallic spatula
- Wipe rims and adjust rings and lids.
For pint jars you can add 1/2 tsp of salt per jar or for quarts add 1 tsp per jar.
Process jars in a pressure canner at 10# of pressure for 25 minutes for pints and 30 minutes for quarts.
Recipe from the Ball Blue Book Guide to Preserving
Honey Dew Melon Jelly
Sweet, Simple... Love!
Honey Dew Melon Jelly
Ingredients:
Directions:
Honey Dew Melon Jelly
Ingredients:
- 1 Honey Dew Melon "gutted"
- 6 cups sugar
- a drop of vanilla
- 1 box sure-jell pectin
Directions:
- Heat melon meat over the stove until it has become liquefied and all the chunks are gone.
- Add Pectin and stir to dissolve
- Add 6 cups sugar stir and return to boil.
- Test your jelly by taking a spoon and dip it into the jelly, and let watch the drips of jelly as they fall back into the pot, if they are thicker and drip together like a sheet your jam is ready. If they fall off quick like rain on a window then your need it to simmer some more.
- Fill hot jars with your jelly
- Wipe off your rims and adjust your rings and lids.
- Flip your jars over for 5 min
- Flip right side up and let set.
- My jelly didn't take long to set up, let cool and store!!

Cantaloupe Jelly
Afternoon y'all!!!! I went to our local farmers market yesterday to pick up a few items and picked up some fruit. I decided to play around and make up some cantaloupe jelly. It is so delicious!!!! My followers on facebook asked for the recipe in high demand.
Ingredients:
1 cantaloupe scooped out of the shell.
6 cups sugar
1 box pectin
Directions:
Heat cantaloupe meat and reduce to a liquid form.
Add box of pectin, heat till it is dissolved.
Add 6 cups of sugar stir and bring back to a boil.
Use sheeting test, to test your jelly.
Fill hot sterilized jars and adjust rings and lids.
Flip upside side down for 5 minutes then flip right side up and allow to cool!
Enjoy!!!

Monday, February 11, 2013
Our Westport Adventure!
Hey everyone, well it seems to have calmed down around here for the most part, so I thought I would share our weekend adventures with you from this weekend!!
My family loves to go camping, my dad has his motorhome, my older brother has his camper and we all enjoy the outdoors, well most of us do. This weekend we headed out to Westport, WA for the razor clam dig!!!


 My girls and my dad decided to head out on Friday night. Me, Jeromey and my son decided to have some alone time and hang back a night before heading out to the beach. As you can see, the girls were totally heart broken hahah!
The next morning, Jeromey, Skyler and myself all got up and got our bags into the car and headed out to the beach, it's about an hour and 1/2 drive out to Westport from where we live. I just have to add, that I did every bit of the driving during this trip.. I didn't want to drive ANYWHERE today!!!
We stopped off at the tower as soon as we go into Westport and met up with my dad and our girls. This is a view from the top of the tower.

The weather turned out to be very decent for us, it wasn't too cold and we hardly got any rain, a little sprinkle here and there but nothing that us Washingtonians can't handle!!!
Next stop we went to have lunch and stretch our legs. So we headed to the Hearty Galley. Their fresh clam chowder was delicious!!! If you want fish and chips stay tuned though.. cause I have the place for that coming up!!!

Here is my monkey's and my dad in front of our lunchin spot!!
Next we did the tourist thing and walked the shops, most of the shops were closed though, right now it is still Winter for them and do not open for another couple months. We picked up some salt water taffy a few souvenirs and a couple other things that weren't on the list.. I got a gorgeous ceramic tiger that I just love!! It is sitting right next to my bed .. he's my guard kitty ;)

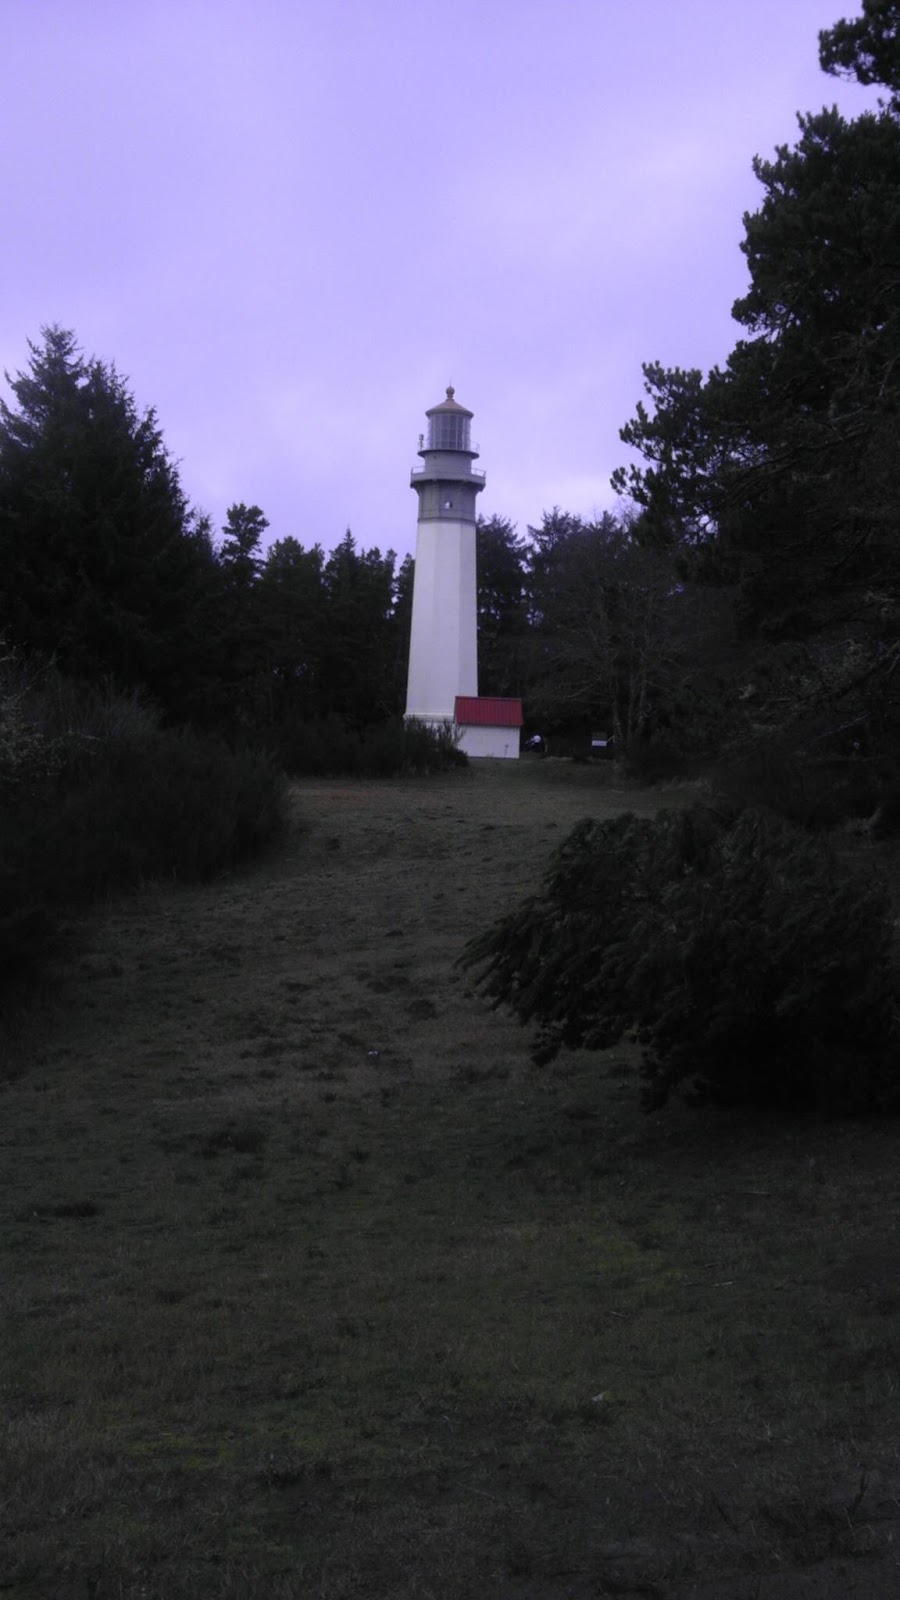
While we were at it we decided to do some sight seeing as well. Here is the old lighthouse.


This one is just of a random house that I thought was very interesting!!


Jeromey couldn't hang and decided to rent me him and my son a hotel room... two queen beds... so my son had his own queen size bed... can you say hog heaven??? This is where he was while I dug up clams, Mr. grumpy was too tired to go to the beach, so him and his dad just chilled in the hotel room while momma brought home the clams :)


My family loves to go camping, my dad has his motorhome, my older brother has his camper and we all enjoy the outdoors, well most of us do. This weekend we headed out to Westport, WA for the razor clam dig!!!


We stopped off at the tower as soon as we go into Westport and met up with my dad and our girls. This is a view from the top of the tower.

Next stop we went to have lunch and stretch our legs. So we headed to the Hearty Galley. Their fresh clam chowder was delicious!!! If you want fish and chips stay tuned though.. cause I have the place for that coming up!!!

Next we did the tourist thing and walked the shops, most of the shops were closed though, right now it is still Winter for them and do not open for another couple months. We picked up some salt water taffy a few souvenirs and a couple other things that weren't on the list.. I got a gorgeous ceramic tiger that I just love!! It is sitting right next to my bed .. he's my guard kitty ;)

While we were at it we decided to do some sight seeing as well. Here is the old lighthouse.

This one is just of a random house that I thought was very interesting!!


Jeromey couldn't hang and decided to rent me him and my son a hotel room... two queen beds... so my son had his own queen size bed... can you say hog heaven??? This is where he was while I dug up clams, Mr. grumpy was too tired to go to the beach, so him and his dad just chilled in the hotel room while momma brought home the clams :)

Big Bro getting things done!

Dad

Baby girl Stacia showing us how things are done :)

Baby Chase (my nephew)
While on the beach my daughter came across an awesome find!!! Crab anyone??


At the end of the day the girls wanted to stay with my dad in the motorhome so me Jeromey and the baby boy decided to go grab some grub!!!! This place has the BEST fish and chips I've EVER had. I ordered the Battered Cod.. OH MY DROOL!!! Yes, it really really really was that good!!!!!!!!!!

If you ever come to Wesport, WA, go to Bennets Fish Shack... best ever!!

The next morning we went to the Tinderbox and picked up a delicous vanilla latte and they suggested Westwind restaurant for breakfast... boy were they right.
Westport is a very small town and a fishing town at the that. I love the small town feel and the ladies at WestWind were excellent, their home fried potatoes were to die for!!!! I cannot wait till the end of the month when we get to do this all over again!!!!!!!!!!!
Friday, February 8, 2013
Canned Chili Beans
Hey y'all!! So I scored a deal on some pinto beans at my local grocery store, so of course I had to pick them up! Today I am going to give you my recipe for canned chili beans, you can spice it up however you like but there is my variation!
In my recipe I used quart jars, since I have a large family that I am feeding so most of my meals are done in quart jars.
This recipe calls for a pressure canner as well, so make sure you have all your pressure canner gear.
Chili Beans: ***Ingredients listed below are per each jar!!


Prepare your pressure canner and can at 10lbs pressure for 90 min.

I like at just above sea level so remember to adjust your pressure per your own elevation.
 Let rest for at least 3-6 hours and make sure all have properly sealed, then store
Enjoy y'all!!!
In my recipe I used quart jars, since I have a large family that I am feeding so most of my meals are done in quart jars.
This recipe calls for a pressure canner as well, so make sure you have all your pressure canner gear.
Chili Beans: ***Ingredients listed below are per each jar!!
- 2 cups pinto beans per jar, that have been soaked overnight (this should fill your jar a little over halfway)
- 1tbs garlic powder ( I like a lot of garlic)
- 1-2tbs chili powder
- 1tsp cumin
- 1/2 tsp cayenne (if you don't like it spicy just add a dash)
- Boiling water
- 1/2 cup thick tomato sauce, I used my tomato powder and made my tomato sauce that way.

- Take your hot sterilized jars and fill them with your beans
- Add all your seasonings and tomato sauce
- Then Fill jars with boiling water leaving 1inch headspace.
- Remove air bubbles with a non metallic spatula.
- Clean rims with a wet cloth.
- Adjust rings and lids.

Prepare your pressure canner and can at 10lbs pressure for 90 min.

I like at just above sea level so remember to adjust your pressure per your own elevation.

Enjoy y'all!!!
Subscribe to:
Comments (Atom)