This is just a quick simple homemade moisturizer mask!
Ingredients:
1/2 ripe avocado
1/4 cup honey
Mash your avocado into a creamy paste
Add honey and mix thoroughly.
Apply mixture evenly over your face
Leave on for 10 minutes
Rinse face with warm water, wipe with warm washcloth to ensure you have removed all of the mask from your face!
Done! Enjoy friends.
Showing posts with label all natural. Show all posts
Showing posts with label all natural. Show all posts
Tuesday, February 26, 2013

Sunday, February 24, 2013
Revitalize Your Hair With Coconut Oil
Us women sure are rough on our hair.. we perm it, dye it, crimp it, curl it, and straighten! We also put gel, hairspray, and so many other products it's not even funny, no wonder our hair is dry and dead!!
Here is an overnight treatment that will leave your hair revitalized, soft by giving it back the natural oils that our daily use shampoos strip it of!
What you need:
Organic Extra Virgin Coconut Oil
Shower Cap

Wrap a towel around your shoulders to protect your clothing from oil stains. Since you are doing this before bed make sure to already have your jammies on prior to treating your hair
Take your coconut oil and completely saturate your hair with the oil. (best if hair is dry before applying)
Take and run a comb through it to ensure you get every strand.
 My daughter took this photo.. didn't even say "Say Cheese" don't I look so happy?
Take and twist your hair up and put on your shower cap, you can also use a hair towel to ensure you don't get any on your pillow and blankets.

Leave this on overnight and it the morning shampoo it out.. you won't regret this, it will leave your hair so smooth and silky!!!!

Totally got photobombed by the 7 year old haha
Use this treatment every other week or as needed!
Here is an overnight treatment that will leave your hair revitalized, soft by giving it back the natural oils that our daily use shampoos strip it of!
What you need:
Organic Extra Virgin Coconut Oil
Shower Cap

Wrap a towel around your shoulders to protect your clothing from oil stains. Since you are doing this before bed make sure to already have your jammies on prior to treating your hair
Take your coconut oil and completely saturate your hair with the oil. (best if hair is dry before applying)
Take and run a comb through it to ensure you get every strand.

Take and twist your hair up and put on your shower cap, you can also use a hair towel to ensure you don't get any on your pillow and blankets.

Leave this on overnight and it the morning shampoo it out.. you won't regret this, it will leave your hair so smooth and silky!!!!

Totally got photobombed by the 7 year old haha
Use this treatment every other week or as needed!
Friday, February 22, 2013
Keep them critters out!!!
Over on my facebook page I've had many requests asking how to keep fur critters domestic and wild and also creepy crawlies out of the garden. I've been doing my research and have compiled a few ideas on how to keep them buggers out of your garden without using any chemicals!
Slugs:
Coffee- take old brewed coffee and put it in a spray bottle spray on your soil surrounding the garden and the slugs will stay out.
Beer Can Trap- Take an old beer can and cut in half, bury it in the soil up to the rim and put some beer, sugar water, soda pop and the slugs will be attracted to it and fall in and drown. You can also use tuna cans for this. Remember to discard the can and contents and replace regularly!
Salt- My grandmother will swear by Hawaiian salt keeping them suckers out!! Line the garden bed with it and fear no slugs!! Note: DO NOT PUT IN YOUR GARDEN. If you have raised beds place around the outside of the bed to keep slugs out... salt can be fatal to your garden, you may not have slugs, but you also may not have a crop to harvest either.
Cats:
Chicken wire- used in many ways.. you can make a cage around your garden or if you want lay out our soil then add a layer of chicken wire to the top of your bed to keep cats from using your garden bed as a litter box.
Coffee Grounds- Keeping coffee grounds in with your soil also can deter cats.
Cayenne Pepper - Sprinkle some of that spice on the outer rim of your garden bed.. I have been told this can work, and it can fail.. some cats are just that stubborn. If you are willing to try it let me know how this one works out!!
Give it it's own space- If you have the room and time.. and if the cat is yours, give the cat it's own outdoor litter box, a small sandbox or even a dollar store litter box filled with litter or sand the cat may be up to using that more then your bountiful garden!.. If the cat isn't yours and you don't know who the cat belongs too I recommend getting a trap from your humane society and getting that cat a home. I know in my area there are more stay cats then owned cats and it is sad how many die on the streets, if each one of us can get a cat off the street to stop it from reproducing more feral kitties won't that help? Just a thought!
Birds:
Bird netting- I know bird netting can be hard to work with but using some pvc you can make a removable cage that is easy to work with!
Here is a link to some plans
Rocks - take a bunch of those garden rocks and paint them to look like lady bugs and strawberries, place them in your garden prior to your fruit coming in and by the time your fruit comes in the birds will be tired of trying!!
Wild Animals. (Deer, Moles, Voles, possums..etc):
Dogs- Having your furry pet around should keep them guys out of your yard, I have followers who swear by it!
Motion Sensors- Motion sensored lights, and/sprinklers. (this can work for them kitties too)
Traps- For possums/raccoon's trap em and remember to re locate at least a few miles away from your home so they don't come back.. I usually make a trip to the woods to get a little mud on my tires to relocate away from the city!
There are other inhumane ways of dealing with moles and voles which my dad has used because moles are such buggers and all our other methods of deterring them had failed.
Hair- yes you read that right.. human hair... deer don't like the smell of us human kind apparently we stink! Sprinkle some around your garden to keep them away!
Bacon- Line the outside of your garden with bacon grease.. them long eared friends don't like the smell, keep them out of your salad garden.
Cayenne- as well as your cats, this will deter coons away from your garden as well.
If you have a request for a certain critter you want to keep out of your garden please ask. I hope that this helps some of you who are looking for remedies to keep them critters away!!!
27 days till spring!!! Who else is itching to get some dirt under their nails? Have a great day y'all!!
Slugs:
Coffee- take old brewed coffee and put it in a spray bottle spray on your soil surrounding the garden and the slugs will stay out.
Beer Can Trap- Take an old beer can and cut in half, bury it in the soil up to the rim and put some beer, sugar water, soda pop and the slugs will be attracted to it and fall in and drown. You can also use tuna cans for this. Remember to discard the can and contents and replace regularly!
Salt- My grandmother will swear by Hawaiian salt keeping them suckers out!! Line the garden bed with it and fear no slugs!! Note: DO NOT PUT IN YOUR GARDEN. If you have raised beds place around the outside of the bed to keep slugs out... salt can be fatal to your garden, you may not have slugs, but you also may not have a crop to harvest either.
Cats:
Chicken wire- used in many ways.. you can make a cage around your garden or if you want lay out our soil then add a layer of chicken wire to the top of your bed to keep cats from using your garden bed as a litter box.
Coffee Grounds- Keeping coffee grounds in with your soil also can deter cats.
Cayenne Pepper - Sprinkle some of that spice on the outer rim of your garden bed.. I have been told this can work, and it can fail.. some cats are just that stubborn. If you are willing to try it let me know how this one works out!!
Give it it's own space- If you have the room and time.. and if the cat is yours, give the cat it's own outdoor litter box, a small sandbox or even a dollar store litter box filled with litter or sand the cat may be up to using that more then your bountiful garden!.. If the cat isn't yours and you don't know who the cat belongs too I recommend getting a trap from your humane society and getting that cat a home. I know in my area there are more stay cats then owned cats and it is sad how many die on the streets, if each one of us can get a cat off the street to stop it from reproducing more feral kitties won't that help? Just a thought!
Birds:
Bird netting- I know bird netting can be hard to work with but using some pvc you can make a removable cage that is easy to work with!
Here is a link to some plans
Rocks - take a bunch of those garden rocks and paint them to look like lady bugs and strawberries, place them in your garden prior to your fruit coming in and by the time your fruit comes in the birds will be tired of trying!!
Wild Animals. (Deer, Moles, Voles, possums..etc):
Dogs- Having your furry pet around should keep them guys out of your yard, I have followers who swear by it!
Motion Sensors- Motion sensored lights, and/sprinklers. (this can work for them kitties too)
Traps- For possums/raccoon's trap em and remember to re locate at least a few miles away from your home so they don't come back.. I usually make a trip to the woods to get a little mud on my tires to relocate away from the city!
There are other inhumane ways of dealing with moles and voles which my dad has used because moles are such buggers and all our other methods of deterring them had failed.
Hair- yes you read that right.. human hair... deer don't like the smell of us human kind apparently we stink! Sprinkle some around your garden to keep them away!
Bacon- Line the outside of your garden with bacon grease.. them long eared friends don't like the smell, keep them out of your salad garden.
Cayenne- as well as your cats, this will deter coons away from your garden as well.
If you have a request for a certain critter you want to keep out of your garden please ask. I hope that this helps some of you who are looking for remedies to keep them critters away!!!
27 days till spring!!! Who else is itching to get some dirt under their nails? Have a great day y'all!!
Tuesday, February 19, 2013
Homemade Instant Oatmeal
I love making my own food.. the convenience is nice when you buy them in the stores but did you know that it's just as easy to make it yourself at home? It isn't time consuming and YOU control the ingredients.. no mystery ingredients that you can't pronounce or even know what they even are!!
Here is my recipe for homemade instant cinnamon and brown sugar oatmeal!

Ingredients:
5 cups quick oats
1 cup instant dry non fat milk
1/2 cup brown sugar
1 1/2 tsp cinnamon
1/4 tsp nutmeg
1/4 tsp allspice
Combine all ingredients in a large bowl, I used a gloved hand to break it all down and combine thoroughly.
This recipe will fit into 2 quart sized mason jars or you can break it down into sandwich sized ziploc bags, 1/4 cup of oatmeal mix into each bag. Combine with 2/3 boiling water and serve.

Here is my recipe for homemade instant cinnamon and brown sugar oatmeal!

Ingredients:
5 cups quick oats
1 cup instant dry non fat milk
1/2 cup brown sugar
1 1/2 tsp cinnamon
1/4 tsp nutmeg
1/4 tsp allspice
Combine all ingredients in a large bowl, I used a gloved hand to break it all down and combine thoroughly.
This recipe will fit into 2 quart sized mason jars or you can break it down into sandwich sized ziploc bags, 1/4 cup of oatmeal mix into each bag. Combine with 2/3 boiling water and serve.

Homemade Granola
Use this delicious recipe to add crunch to your yogurt or just pour a little almond milk over this alone and enjoy.
A healthy flavorful alternative to those breakfast cereals and bars that are FULL of sugar!!
Granola:
4 cups quick oats
1 1/2 cups sliced almonds
1/2 cup light brown sugar
1 tsp cinnamon
1/4 tsp salt
1/2 tsp pure vanilla extract
1/2 tsp hazelnut extract
1/2 cup coconut oil
1/2 cup honey
add in your choice of dried fruits. Blueberries, cranberries, raisins.. etc..
Preheat your oven to 300
Combine oats, almonds, brown sugar, cinnamon and salt.

In a small pot on low warm your honey and oil and stir in the extracts
 Add liquid to the oats mixture and combine with a wooden spoon. Use gloved hand to fully distribute.

 Place on baking sheet and bake for 20-30 min stirring ever 10 minutes.
Allow to cool to room temperature and add in your choice of dried fruits and place in an air tight container

Enjoy to your liking!!! Thanks for visiting y'all!!!
A healthy flavorful alternative to those breakfast cereals and bars that are FULL of sugar!!
Granola:
4 cups quick oats
1 1/2 cups sliced almonds
1/2 cup light brown sugar
1 tsp cinnamon
1/4 tsp salt
1/2 tsp pure vanilla extract
1/2 tsp hazelnut extract
1/2 cup coconut oil
1/2 cup honey
add in your choice of dried fruits. Blueberries, cranberries, raisins.. etc..
Preheat your oven to 300
Combine oats, almonds, brown sugar, cinnamon and salt.

In a small pot on low warm your honey and oil and stir in the extracts


 Place on baking sheet and bake for 20-30 min stirring ever 10 minutes.
Allow to cool to room temperature and add in your choice of dried fruits and place in an air tight container

Enjoy to your liking!!! Thanks for visiting y'all!!!
Monday, February 18, 2013
Seedlings!!!
It is that time of year again!! Spring is upon us and we have the fever!!! I myself have gotten all 3 of my garden beds prepped and filled with dirt and manure. I have started a few of my colder weather seedlings (cabbage, broccoli, cauliflower and a variety of peas) and some of my indoor container plants as well like my jalapenos!!!
So in honor of spring I wanted to give some alternative/repurposing tips to save you money on seedling starters!!!
Grow your seedlings in eggshells. Yes I said eggshells, crack open your egg when making breakfast and save the shell halves. Fill with dirt then plant seedlings in them! When replanting you don't even have to remove them from the shell. Just break a the shell on the bottom to allow the roots to grow!

Eggshell Cartons. Fill with dirt then plant your seedlings!

Take an old paper towel roll and cut into thirds...

I make 4 cuts in the bottom as shown

and fold them over tape it shut.

When it's time to transplant just remove tape, unfold and place in the ground :)
I hope that these have given you some ideas on how to get your seedlings going without paying the price for those expensive seedling pods :)
So in honor of spring I wanted to give some alternative/repurposing tips to save you money on seedling starters!!!
Grow your seedlings in eggshells. Yes I said eggshells, crack open your egg when making breakfast and save the shell halves. Fill with dirt then plant seedlings in them! When replanting you don't even have to remove them from the shell. Just break a the shell on the bottom to allow the roots to grow!

Eggshell Cartons. Fill with dirt then plant your seedlings!

Take an old paper towel roll and cut into thirds...

I make 4 cuts in the bottom as shown

and fold them over tape it shut.

When it's time to transplant just remove tape, unfold and place in the ground :)
I hope that these have given you some ideas on how to get your seedlings going without paying the price for those expensive seedling pods :)
Trash to Treasure. Benefits of Coffee Grounds
For those of you who don't know. I am from the great state of Washington. What do you think of when you think of Seattle? Coffee?? Uh huh! hahaha.. well yes I do drink lots and lots and LOTS of coffee. So, why put those coffee grounds into the trash when they are so beneficial to your garden bed? Don't drink coffee? No problem, just visit your local/favorite coffee shop and I bet you they are more then willing to share those rich grounds with you as well!!
Benefits of coffee grounds:
- Worms LOVE to feed on coffee grounds and we all know that worms aerate the soil for us, bring on the worms :)
- Cheap and easy to come by
- Coffee is a great source for Nitrogen, Calcium and Magnesium, which are extremely beneficial to your vegetable garden.
- More tolerable to deal with then manure
- Coffee is also a natural slug and snail killer... just spritz the ground with some day old coffee and keep them nasty buggers out of the garden!
So before you throw out those old coffee grounds STOP no no no.. not in the name of love, and it's not hammer time either! Don't toss em, save em. I place mine in an old butter tub, It doesn't take but about a week for mine to fill.. I also crush up my eggshells and mix them together for a wonderful fertilizer!
Wednesday, January 9, 2013
Waste not, want not. Getting a second harvest out of store bought celery!
Morning y'all, and Happy New Year, man I've been up since 4am!! Really, I never wake up this early, but good thing I have my coffee in hand to keep me going through the day!

Been a couple weeks since I've been on but I've been busy between work and my personal prepping at home and my new Facebook page, have a checked it out yet? Prepper Nicki's Nook. The page has really taken off and I love my followers so much on there, I just love the community I have growing on there.
Anyway's today I will be showing you how to re harvest that celery you bought from the store! Don't throw away that butt end! No, stop that right now and get you a glass of water to put it in... like so
 Celery in the middle, yea.. that one.. do that!! As a couple days go by you can see those outer layers, those are gonna have to go, but not just yet, you wanna let some new growth begin before you start pulling off those outer layers.
 Watch how fast this is growing for me, indoors, on my bakers rack, as we speak!!

I was very surprised myself at how fast this took off for me, before this it was headed for the compost!!
You can see in the new few images how I have started to remove those outer layers as the new growth begins to come in strong.

On day 5 I put it into some potting soil, water just does not have enough nutrients for the stalks to grow up tall and thick. Make sure you water your new plant I have not had an issue with warmth or light so far and I live in Western Washington, right now we aren't getting much sun and the rain is constant, but like I said, this is an experiment I am doing indoors.
 Day 7 and I have removed all of those extra outer layers and look at how beautiful and well this is growing!!
 Today is day 8... and look at the significant growth from day to day!! WOW!! I will be doing daily blog updates on this to show you how my progress is going and any adjustments I would advice!! Till the next update y'all!!!


Been a couple weeks since I've been on but I've been busy between work and my personal prepping at home and my new Facebook page, have a checked it out yet? Prepper Nicki's Nook. The page has really taken off and I love my followers so much on there, I just love the community I have growing on there.
Anyway's today I will be showing you how to re harvest that celery you bought from the store! Don't throw away that butt end! No, stop that right now and get you a glass of water to put it in... like so


You can see in the new few images how I have started to remove those outer layers as the new growth begins to come in strong.


Tuesday, December 25, 2012
Dehydrated Ground Turkey
Hey y'all!!! Okay so here is a food storage helper for ya today!!
I've taken a dive into the dehydrating world and let me tell you, I'm HOOKED!
My dehydrator has given me many treats that me and kids both love. I swear my children every time I go to the kitchen and they see those giant aluminum things sitting on the counters my oldest shakes her head and just turns the other way like "momma's gone Coo Coo" hahaha But.. that is besides the point.
Today I'm gonna show you my recipe to dehydrate Ground Turkey.

So I took 1lb of Ground Turkey and about a 1/2 cup of my homemade breadcrumbs and mashed that all together.
I then cooked it till it was cooked all the way through and then laid it out on thick paper towels to absorb all the extra moisture.. I changed out my paper towels and let it sit in the fridge overnight.
Next morning I came in and divided my turkey in between 2 of my trays and let it dry for 2 hours at 145 after that I dropped the temp down to 125 for 6 more hours.
The finished product was GORGEOUS. I still have no idea exactly how long dehydrated meat will last. I have been told that if stored properly and in a cool dry place OUT of direct sunlight that it will last for at least a year. I only made a pound of this so I'm obviously going to be using it before then but I do intend on experimenting to see how long this will last us after proper storage.
Thanks for droppin by y'all!!!
I've taken a dive into the dehydrating world and let me tell you, I'm HOOKED!
My dehydrator has given me many treats that me and kids both love. I swear my children every time I go to the kitchen and they see those giant aluminum things sitting on the counters my oldest shakes her head and just turns the other way like "momma's gone Coo Coo" hahaha But.. that is besides the point.
Today I'm gonna show you my recipe to dehydrate Ground Turkey.

So I took 1lb of Ground Turkey and about a 1/2 cup of my homemade breadcrumbs and mashed that all together.
I then cooked it till it was cooked all the way through and then laid it out on thick paper towels to absorb all the extra moisture.. I changed out my paper towels and let it sit in the fridge overnight.
Next morning I came in and divided my turkey in between 2 of my trays and let it dry for 2 hours at 145 after that I dropped the temp down to 125 for 6 more hours.
The finished product was GORGEOUS. I still have no idea exactly how long dehydrated meat will last. I have been told that if stored properly and in a cool dry place OUT of direct sunlight that it will last for at least a year. I only made a pound of this so I'm obviously going to be using it before then but I do intend on experimenting to see how long this will last us after proper storage.
Thanks for droppin by y'all!!!
Thursday, November 15, 2012
Homemade Laundry Soap!!!
WOW!!! What a LONG weekend. Sorry ya'll the laptop has been down the last couple days, but watch out, I'm back in action.
So first of all, veterans day weekend was an absolute BLAST!!! Started out the weekend by doing one of my favorite things, you got it, line dancing at the local country bar!! That's me there in the middle with the white lace shirt on. :)
 Followed by a day out in the woods with my older brother!!! Beers, Mud, and woods? Can I get a hell ya???
 My most favorite past time!!! Gettin a little mud on them tires!!! Doin it country style!!


So first of all, veterans day weekend was an absolute BLAST!!! Started out the weekend by doing one of my favorite things, you got it, line dancing at the local country bar!! That's me there in the middle with the white lace shirt on. :)

Well, that was my weekend!!!
Today I have some homemade laundry soap on the menu.. Love love love this recipe, I will never buy store bought soap EVER again!!! Took me literally under 30 minutes to make. No kidding. Plus it smells amazing, I don't have to use fabric softener unless I'm doing my towels that is. :)
Ok, here we go..
Ingredients:
2 bars fels naptha or zote bar laundry soap grated.
1 box borax
1 box WASHING soda not to be confused with BAKING soda.
Oxi Clean I use the smallest tub of it.
Scent Booster such as downy unstoppables or gain fireworks. (entire bottle of it.)
I mix all of my ingredients in double bagged trash bags then transfer to my container.
Grate your soap and pour ALL the named above items into your trash bags, give it a toss or 10 and transfer into your preffered container.
The oxi clean comes with a scoop. I reuse the scoop and use it to put my soap into the DRUM of my HE washer, DO NOT put in the soap tray, but into the yes DRUM.

It really really is cost effective, a child ran off with my receipt so I'm going to be making another batch in a few weeks and will post my savings and exact measurements on the boxes of ingredients and some more pictures to come.
Please, if you have questions or comments, please feel free. Love getting feedback!!
Till next time, later ya'll!!!
Thursday, November 8, 2012
The Sweet Smells of Home!
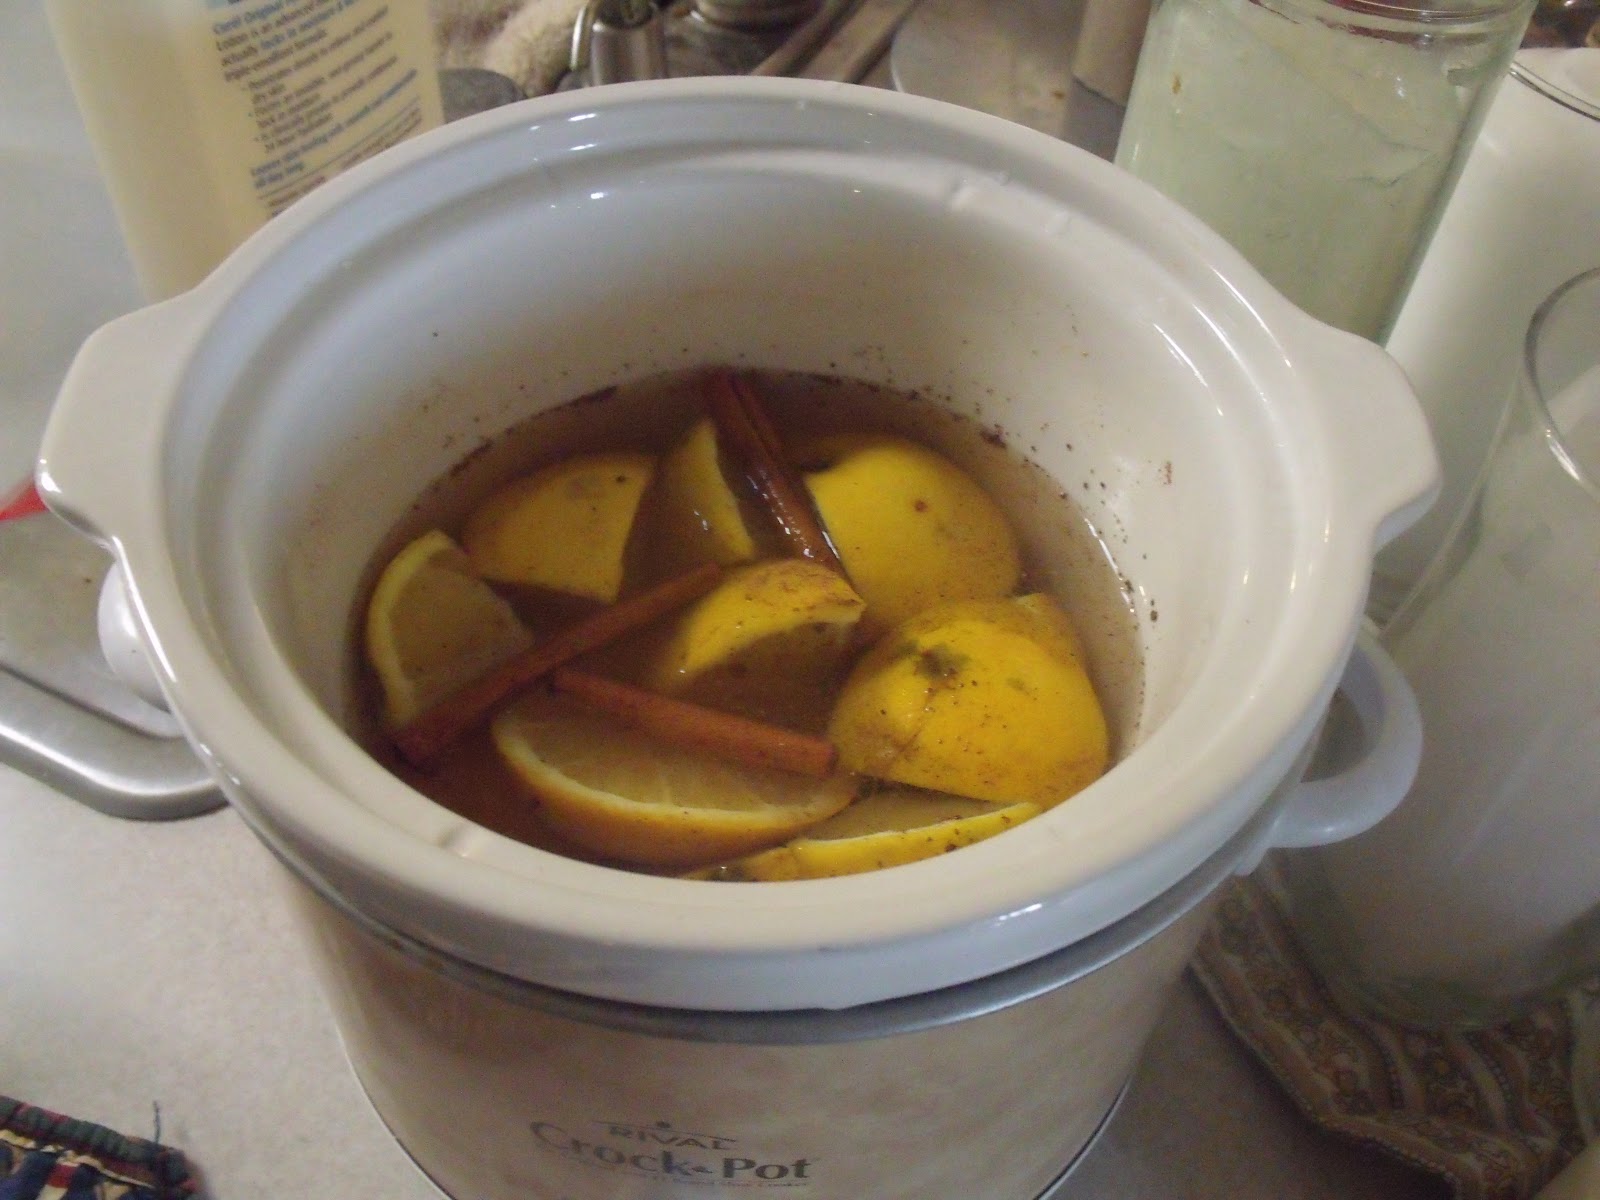
Afternoon ya'll!!! Ok so here is my do it yourself natural home fragrances!! Get rid of those expensive plug in air fresheners, talk about a waste of money!! Plus, what's in those things that make them smell so good? Ooooh, I dont know either, but I don't know if I really want to chance my children or myself breathing it in!! This recipe takes less then ten minutes to throw together, and its once again all natural!
Today I will be featuring my favorite! Orange Cinnamon or Apple Cinnamon.
I will be giving you the recipe I use for my mini crockpot that I use to heat this.


2 Oranges, I quarter my oranges (if using apples I do the same.)
4 sticks of cinnamon
4-5 whole cloves
a dash of allspice
a dash of nutmeg
I toss all my ingredients into my mini crockpot
 Cover your ingredients in water.
 Place it in your crockpot and turn it on low. LID OFF! Your water will eventually evaporate yes. Just keep an eye on it so it doesn't burn, I've left mine on low literally all day and never had a problem with it burning.
Run it for a few hours, and if you like you can tranfer to a jar and save your scents for later use. Use up to 4-5 times. Store your leftover scent in a sealed jar in your fridge for up to 2 weeks.
Its smart, its easy, its all natural!!
Today I will be featuring my favorite! Orange Cinnamon or Apple Cinnamon.
I will be giving you the recipe I use for my mini crockpot that I use to heat this.


2 Oranges, I quarter my oranges (if using apples I do the same.)
4 sticks of cinnamon
4-5 whole cloves
a dash of allspice
a dash of nutmeg
I toss all my ingredients into my mini crockpot

Run it for a few hours, and if you like you can tranfer to a jar and save your scents for later use. Use up to 4-5 times. Store your leftover scent in a sealed jar in your fridge for up to 2 weeks.
Its smart, its easy, its all natural!!
Subscribe to:
Posts (Atom)